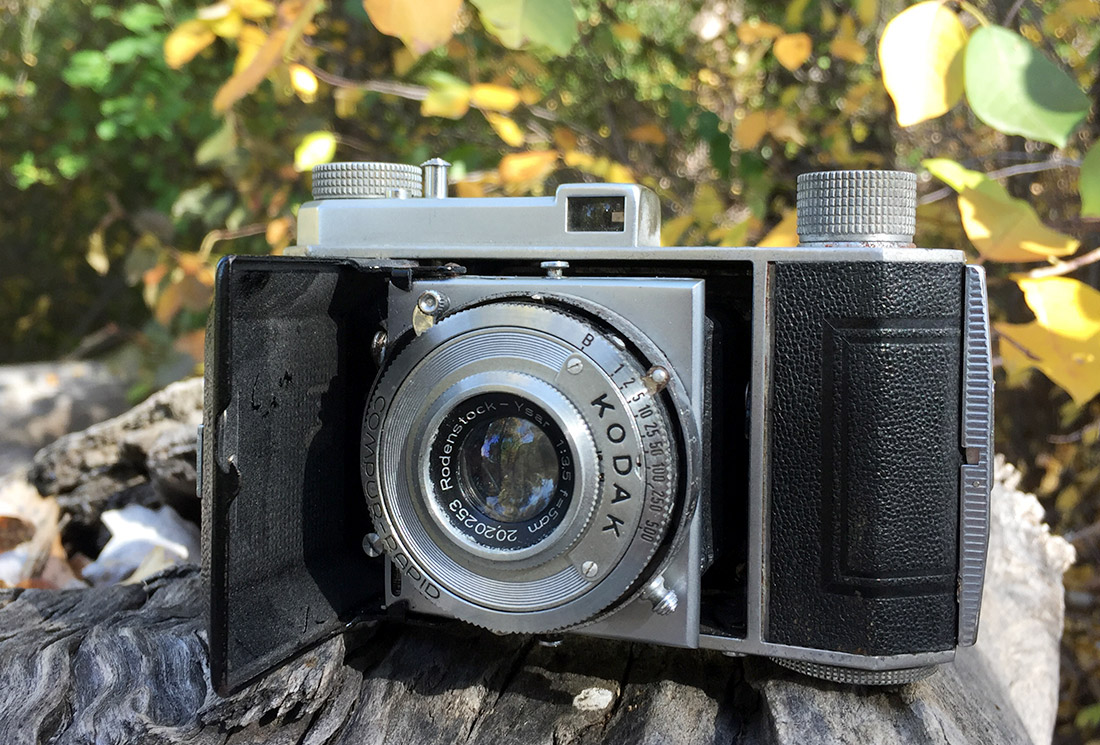
I found the Kodak Retina I at — you guessed it — a thrift store and initially struggled to identify it, but it’s a fun early folding 35mm camera.
Manufactured in Germany through many iterations since well before World War II, the Retina line took a breather during the war for obvious reasons. Kodak AG resumed production with the type 010 in late 1945. Closely resembling its pre-war predecessor, the type 148, the type 010 saw minor improvements after a year or two before being discontinued in 1949.
The primary differences between the early and late type 010 versions are the angle of the focus knob at infinity focus, and the shape of the focus knob itself. The earlier version has a squat, semi-conical knob and infinity focus is with the knob to the lower left corner of the lens board (from the perspective of one holding the camera ready for use). The later version has a knurled barrel-shaped knob and infinity focus at in the lower left corner. See these more-detailed images of the differences. Mine appears to be the early version.
Details
The Retina I type 010 was available with several different lens options and either a Compur (1/300) or Compur-Rapid (1/500) shutter. The lens and shutter are mounted on a focusing helicoid at the end of a short bellows that extends when the front cover is opened. Both shutter options offer speeds down to 1 second plus Bulb.
The Retina line included many of Kodak’s best offerings for several decades after the first Retina was release in 1934, and with it the 35mm film cassette we all know and love. Most of the line were made in Germany and many lenses produced by highly respected large-format lens maker Schneider-Kreuznach were available, as well as Kodak and Rodenstock lenses.
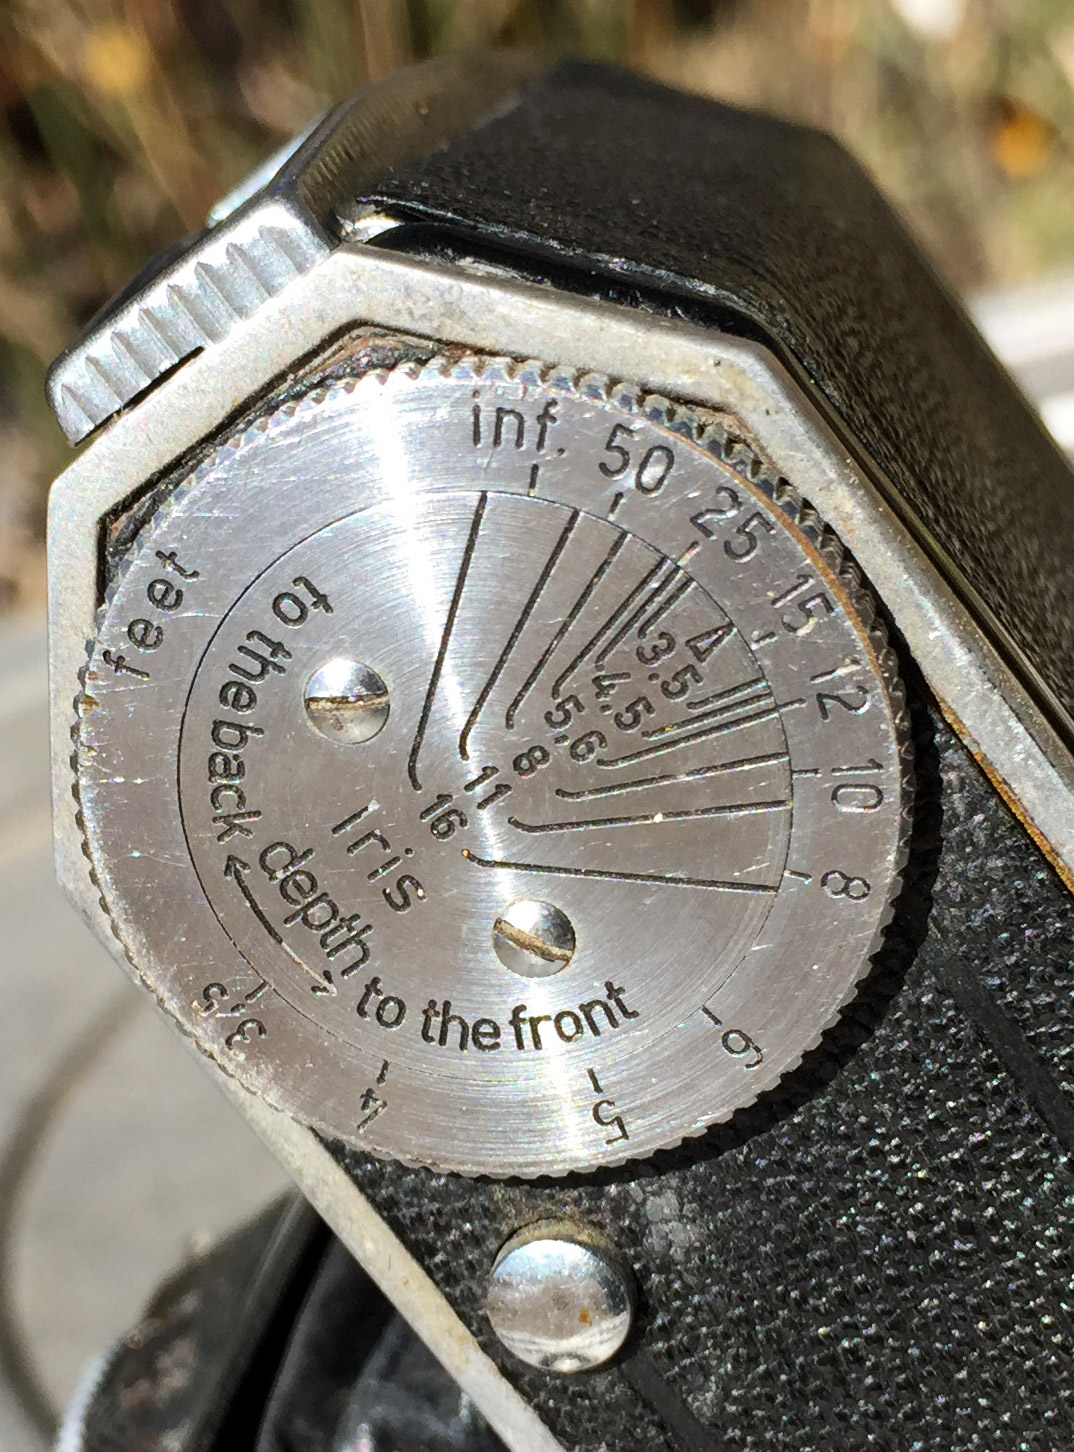
Focus is set by a distance scale, and a small calculator on the bottom cover helps determine depth-of-field. The viewfinder is a simple reverse-Galilean type in the center of the top cover. Next to it are two screws that can be used to mount an accessory shoe that was, inexplicably, omitted from this model despite being present on earlier Retina I models (later models featured an updated top cover that included a cold shoe).
The frame counter on the top cover must be reset by hand with each new roll, but counts up automatically when the film is advanced. The advance knob stops when a single frame has been advanced. The shutter release on the body is locked until the film has been advanced for double-exposure prevention, and is mechanically coupled to the shutter release lever on the shutter assembly.
The Retina uses an idler spool with geared ends, which engage the film’s sprocket holes, to operate the frame counter, release the shutter button and stop the advance after one frame. Film must therefore be loaded for any of these features to function, and without it, the advance knob spins freely and endlessly.

The shutter must be set manually for each shot by means of a lever on the top left of the lens assembly. The shutter can be operated without film by manually pushing the release lever down on the top right of the lens. There is a separate standard release cable thread between the release button and the advance knob on the top cover.
Most models appear to have been equipped with a maximum aperture of f/3.5, and stops down to f/16. The aperture indicator is on the top edge of the shutter assembly and the setting is adjusted by means of a small lever on the underside of the shutter.
To rewind the film, slide the take-up spool release switch, on the back of the top cover below the advance knob, to the “R” position (the advance knob is engaged on the “A” setting). The rewind knob is on the left-hand end of the top cover and does not have a crank handle. It does slide up to disengage the cassette when rewinding is complete, however.
To load or unload film, open the back cover by opening the latch in the center of the left-hand end of the camera — a lever-type switch that pulls out and down with a fingernail.
Next to the depth-of-field calculator on the bottom cover is the rounded release button for the front cover. On the opposite end is a standard tripod thread. To close the front cover, depress the two small buttons on the top and bottom of the lens board. The “Kodak” badge on the front cover is actually a leg that flips out to allow the camera to stand vertically like many larger folding cameras.
The Kodak Retina I manual is a good read and chock full of Kodak’s marketing-laden mid-century terminology.

In Operation
Deceptively simple in appearance, the early Retinas were quite advanced mechanically. Unfortunately, this means there were a lot of moving pieces and therefore many possible points of failure. I have several and they all seem to have issues.
This one’s problems mostly relate to the shutter: the speeds are off (and get less and less accurate with each step slower on the scale), and the shutter release button coupling seems to have some issues that make it fail to actually release the shutter most of the time (which can be easily overcome by operating the lever directly).
Adding the scale focus to the mix I found testing the Retina type 010 rather tedious and only made it through one roll of film. I suspect surface rust, which is present all over the focusing helicoid’s distance scale, has invaded other parts and caused them to bind. There are faint marks around the edges of the lens elements which may be the beginnings of fungus growth, and considerable rust on the edge of the inside of the lens board. I suspect this camera came to Colorado from a much more humid environment.

Nevertheless, the early Retina models score very high for noticeability, constantly netting comments and questions with their fairly unique appearance. The are are also very solidly built and their size fits comfortable in the hand. Control layout is fairly intuitive and comfortable in operation, as well. All that said, the sharp corners and edges detract from what could otherwise be a very comfortable camera to hold.
I found the rewind knob tall enough and meaty enough to get a good grip on and rewind quickly and easily. The knurled surface on the rewind and advance knobs is textured well for a good grip without being sharp like on some cameras (I’m looking at you, FED-5c) — although it’s not clear if that’s by design or the result of age and use in the case of my unit.
The take-up spool release, while it appears to be conveniently placed near your right thumb at first glance, turns out to be fairly easy to hit by accident, or while sliding the camera in or out of a bag or pocket.

I found that with my type 010 setting the shutter before operating the film advance, for whatever reason, seemed to more often result in the coupled shutter release on the top cover functioning properly. I didn’t test it extensively enough to prove causation, but felt the correlation was worth mentioning.
The viewfinder offers no parallax correction of any kind, and it is very tiny. I found it somewhat dim, but that may be the result of age and accumulated dust and grime. Similar to an old Leica, too, it seems to show a bit more than what will be exposed on the film, so it’s worth giving your subjects from breathing room to be sure nothing’s cut off.
Loading and unloading are quite straightforward, matching the procedure for most late-20th century cameras. The latch to secure the back cover is secure but easy to operate.
The depth-of-field calculator on the bottom cover is an elegant and attractive solution, and easy to use. Rotate the outer ring to select the distance you’ve determined and read the marks indicated for the selected aperture (marked “iris”).

While the bellows on mine is in excellent condition, the existence of a bellows is a big liability to the long-term reliability of this model, especially given the camera’s age.
As a stunning example of design straddling Machine Age and Art Deco styling, the Retina I succeeds fantastically. As a working camera, however, it falls short. I’ve used far worse, but the type 010 leaves rather a lot to be desired — mostly in terms of design advancements that would come within just a few years.
Older Retinas are quite collectible, though, and can be had relatively inexpensively. In good condition, I might like this just a little better.


