As I started falling down the well of education and experimentation that is film photography I developed GAS, or Gear Acquisition Syndrome, just like most photographers. Mine skewed toward the old, the unique, the broken and forgotten.
Fellow Denver film photographer Shoot Film, Ride Steel has his “Land of Misfit Toys,” and I think of my collection of the lost and broken as a Home for Wayward Cameras.
When I started the collection with the Imperial Herco 620 Snapshot, I had no idea how far it would go. And a few good enablers like Kate and my mom have helped expand it beyond my wildest thoughts.
And so it was that a couple years back, Mom gave me a vintage Voigtlander Bessa I camera for Xmas. Here’s what I’ve learned about this big, elegant folder so far.
Specs and stuff
The Voigtlander Bessa I is a 6×9 folding viewfinder camera made from 1949 until about 1957 (the information I can find seems unclear on when they stopped production). Originally it was sold with a 6×4 mask, as well, so it’s basically got a half-frame option.
At 6x9cm, the negatives are the same aspect ratio as 35mm frames — 1:1.5. But at 36x24mm, a 135 frame covers 864mm², or 8.64cm². The frames the Voigtlander (or any 6×9 camera, really) makes cover 54cm². That’s more than six times as much area, and six times as many molecules of silver halide available to make big, beautiful negatives.
Set for 6x4cm, you’re still getting nearly three times the image area as a 35mm frame. You’re also getting 16 frames on a roll of 120 film instead of just eight. The biggest downside as I see it is that you’re always holding the camera vertically (unless you’re one of those people who hasn’t yet realized that landscape exists, or suffer from Vertical Video Syndrome). There is a switch near the viewfinder that engages a mask you can use to compose your half frames more accurately, and a dial above the viewfinder which mode the viewfinder mask is in.

The viewfinder switch is also used to engage the parallax correction — there are actually four settings, marked “4×6 1m/3f,” “4×6 ∞,” “6×9 1m/3f” and “6×9 ∞.” Just switch to the 1m version of each for a parallax-corrected mask — which appears upon close inspection to act almost as an aperture inside the surprisingly-accurate viewfinder — for taking portraits and other close-up shots.
My Bessa came to me without the 6×4 mask that locks into the film bay, unfortunately. Lucky for me I have other 6×4.5 cameras and I really just wanted to make 6×9 frames, anyway. Those gigantic negatives call to me.
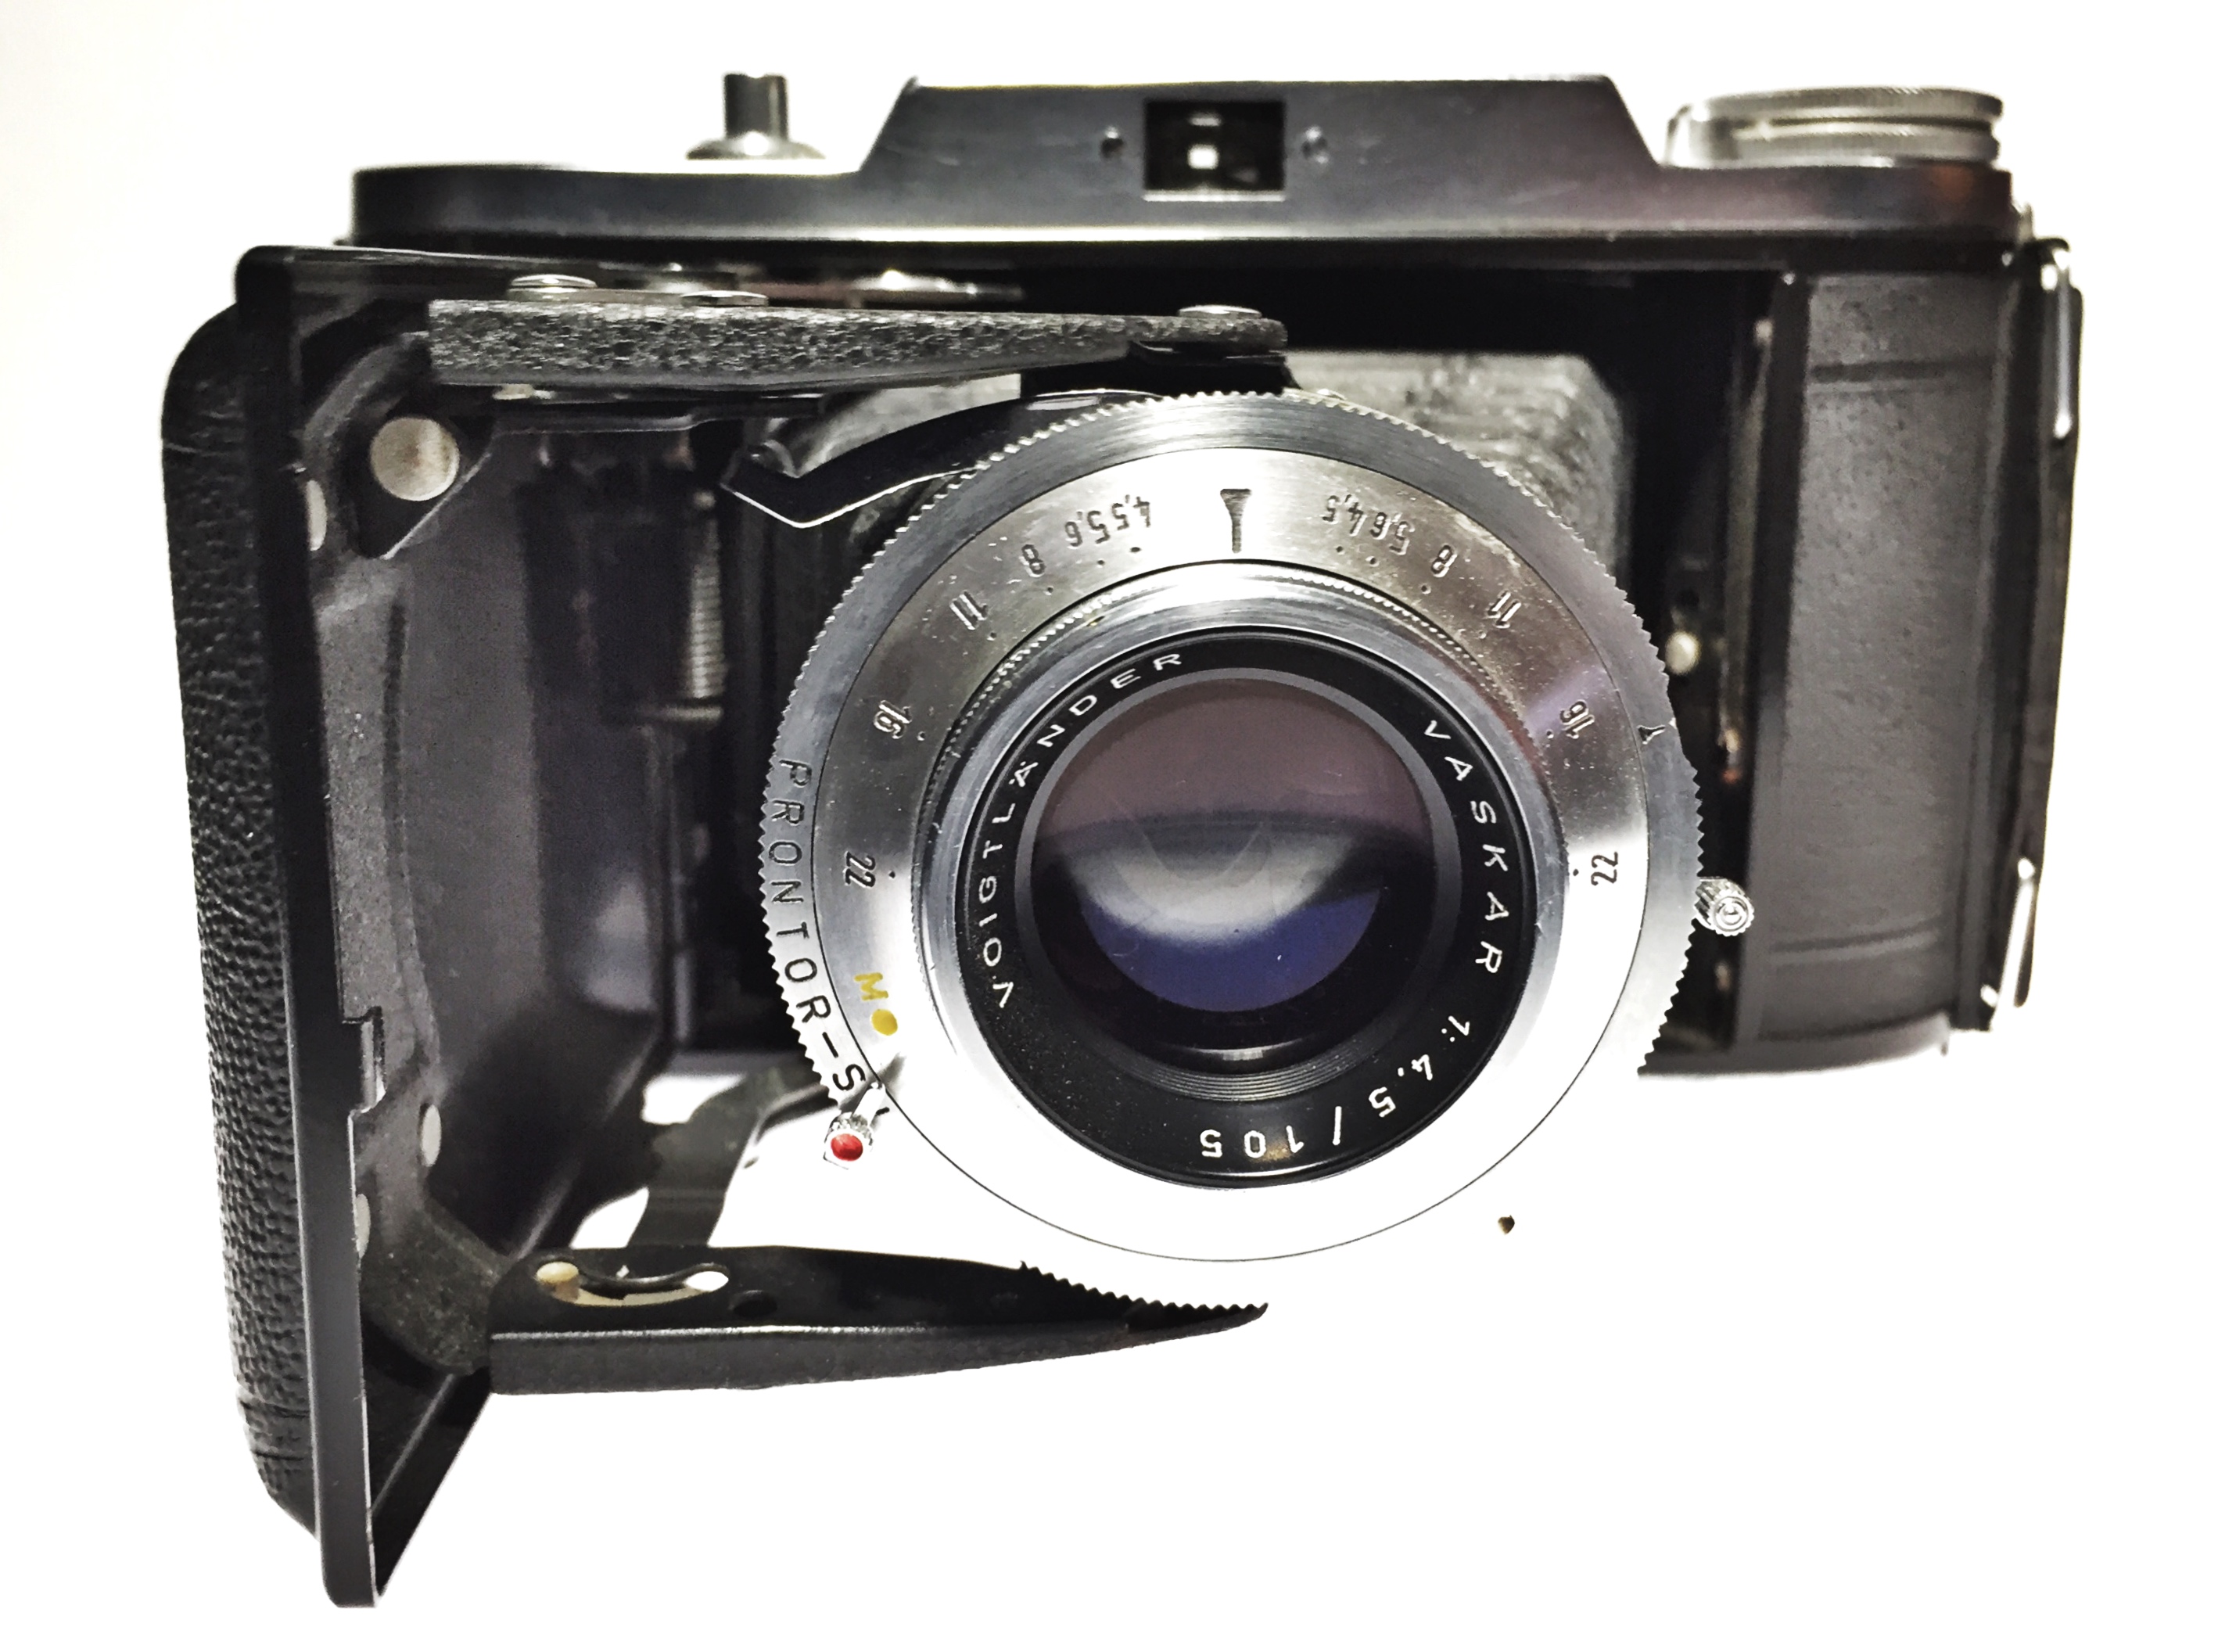
The lens on the Bessa I was available in two flavors: a three-element 105mm f/4.5 Vaskar and a four-element 105mm f/3.5 Color-Skopar Tessar type. These are mounted on a variety of Prontor and Compur Rapid or Synchro-Compur shutters. Mine has the Vaskar lens and a Prontor SV with shutter speeds ranging from 1 sec. to 1/250th.

Since the Bessa I doesn’t have a rangefinder, it uses zone focusing. But because the lens doesn’t open up super-wide and the shutter isn’t super-fast, you’ll probably find yourself shooting stopped down a lot — most of these frames we made at f/8 or f/11 — given you plenty of depth of field to play with. This means that zone focusing isn’t as bad as some of my past experiences. Every frame in this post was made basically by guessing at the distance.
In addition to the focusing scale (which has distances marked only in meters), the Voigtlander has two “snapshot settings.” A triangular mark is for closer shots such as portraits or smalls scenes (the example given in the original manual is of two kids playing on the lawn). A round mark is for grander scenes and landscapes. According to the manual, if you stop down to at least f/11, the triangle should offer enough depth of field to be in focus from about 2.5 meters to 5 meters, and the circle from 5 meters to infinity (so it identifies the lens’s hyperfocal distance).

Loading the camera is similar to most medium format cameras, with some classy touches. To place the take-up spool, pull up on the advance knob. Position the take-up spool and gently press the winder while turning until it engages the spool and snaps down.
To put the new film in there is a small, spring-loaded plate at the top of the chamber you can slide up. Tilt the bottom of the spool onto the peg and then lean the top in. Let go of the plate and wiggle the top of the spool until the pin engages. Once you’re done shooting, you’ll lift the winder knob again to remove the exposed roll.
While shooting you’ll gauge distance, focus, set your exposure with the aperture lever and shutter speed ring, cock the shutter with a small lever on the top-left of the assembly (as you hold the camera in front of you — top right if your pointing it at yourself), frame your shot in the big, bright, viewfinder, and press the shutter button on top. Thanks to the double exposure lock, you’ll have to advance the film before you can depress the shutter button again.
The double exposure lock blocks the shutter release button and displays an arrow in a small window just behind it. When the arrow points at the shutter button, it’s ready to fire. After it locks, the arrow rotates to point left, toward the advance knob. When the film has been advanced far enough to make a 6×4 frame, the lock resets and the arrow rotates back to point at the shutter release again.
Other miscellaneous features include two different-sized tripod mounts on the bottom corners, a really nice-sized leather handle on the right size of the body, M/X flash sync switch and remote trigger socket, a cold shoe and an internal cover for the film counter window that can be turned with a stiff thumb on a knurled disc in the center of the film door.

The Bessa experience
It’s always a pleasure to go out with a high-quality camera, even one that was eclipsed in features and function decades ago. The Voigtlander is no slouch in this department. It’s clear from just a few seconds holding it that the level of care that went into designing and building the Bessa was far from insignificant — and clearly contributed to the name’s nearly 90-year history.
My Bessa I isn’t the top-of-the-line model — far from it, actually. It has the low-end lens and shutter, and the … well, there aren’t really any other things that could have high- or low-end options, so it’s all about the lens and shutter.
On the plus side, the film plane is clean and the bellows is light-tight. There are a couple small dents on the top plate, as well as a little corrosion by the film advance knob. Lastly, the linkage from the shutter button on the top plate to the release on the shutter assembly has a piece with some rust on it.
That rust was causing the linkage to stick a little after I pressed the shutter. While it did not seem to affect the functioning of the shutter itself, it delayed the button from returning to the ready position right away. I put a tiny drop of sewing machine oil on the rusty spot and the performance improved dramatically.

Ease of use factor is pretty darned high. Obviously if you’re unfamiliar with exposure and zone focusing, maybe it would be a little more troublesome. Everything operates very easily, though.
The focus ring turns smoothly, as does the film advance knob, and the aperture and shutter speed adjustments, and the viewfinder mask switch. And the shutter button. And the door release and hinges and springs. So yeah, basically everything functions perfectly. Oh — did I mention the shutter speeds seem accurate and fire smoothly with no oil on the blades? And the aperture moves smoothly and beautifully? Yeah, basically it operates flawlessly.
What’s wrong with it? Well, let’s see. It’s a bit on the heavy side. While it is quite compact for what it is, it still is not quite pocket-sized. And remembering to cock the shutter, despite having a dozen other cameras that require this as a separate action, continues to escape all attempts at becoming habitual.
Also it takes slightly odd frames — they aren’t square at the corners, instead having the corners nicked off a tiny bit. So really they’re more octagonal. This encourages you to crop in just a tad from the short sides, which could be a good thing. You’ll see why below when I explain the adventures I had testing this giant gem.
All about that lens
Late last winter I put my first test roll through the Voigtlander and was pretty thrilled with the results. I got a few of my exposures off by a bit, and I hadn’t bothered to read about the camera’s features or operation at all. Nevertheless, the resulting frames were not half bad. Focus wasn’t too far out in the good ones, and the latitude of Tri-X let me rescue most of the frames’ exposures. This one turned out okay:

I decided I would definitely need a second roll of test shots to learn the camera better and get some frames to better demonstrate its capabilities when it came time to write this post. I had some T-Max 400 gathering dust and decided to try that.
I took me a while to get through the second roll; the Bessa is just big enough to be inconvenient to carry around just all the time. It does fit well enough in the pocket of my jacket, but it was summer. I did eventually finish the second roll, but I still didn’t quite get the results I was looking for.

So I gave it another try. Don’t worry, I really am working up to the lens, which is what this is ultimately all about. The third roll came along on our trip last August around the Alpine Loop, Hunstman Mesa and the Powderhorn Valley.
I didn’t develop that film for awhile, though. And I learned why you’re supposed to develop roll film quickly after it’s exposed: on the last couple frames a little bit of light leaked around the backing paper and fogged the edges of the film. Fortunately it didn’t creep in far enough to affect the actual frames.

This was when I confirmed a little problem I thought I had noticed on the previous roll: focus issues. Fortunately they’re only on the areas farthest from the center, and the degradation is fairly quick, so the affected area is relatively small.

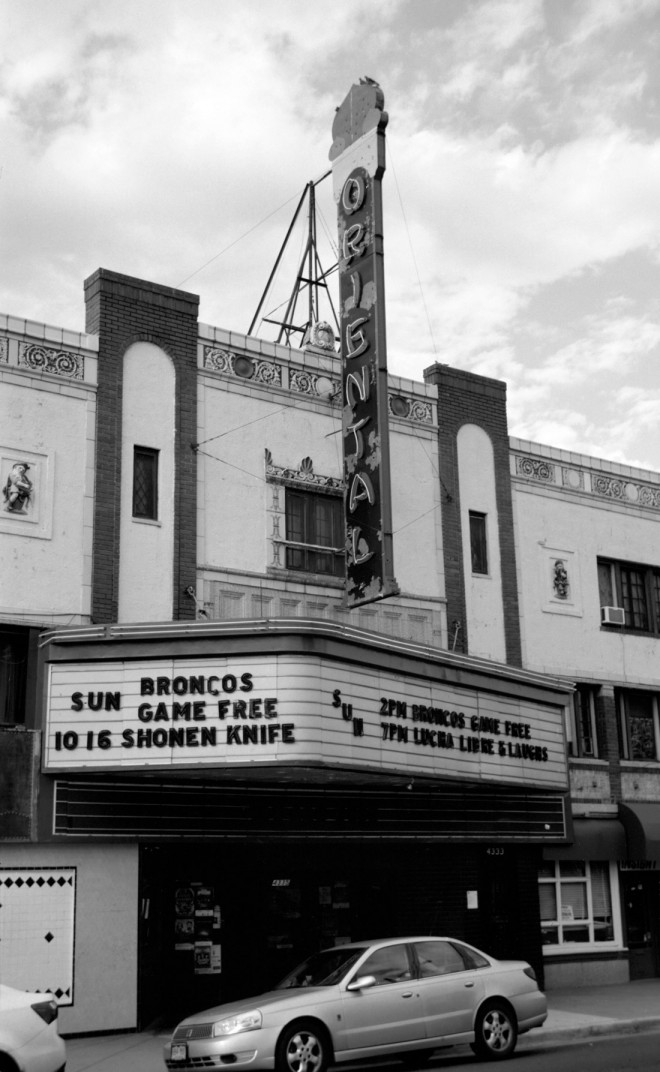
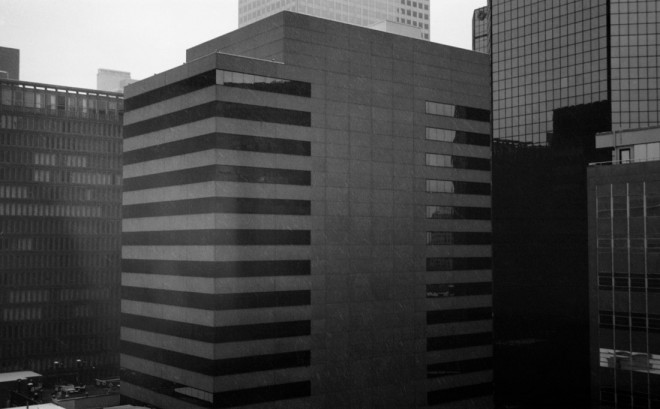
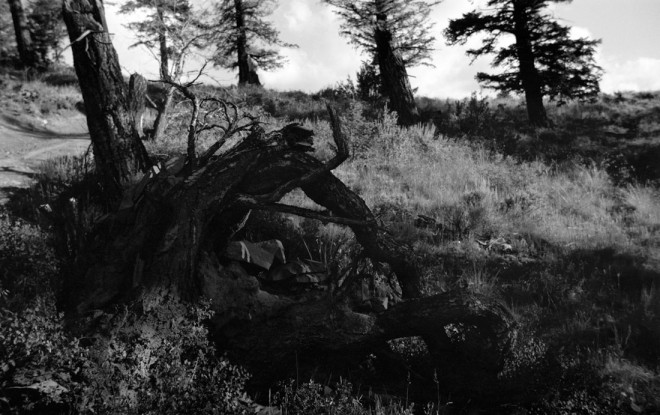
As you can see from the detail versions, focus is exceptionally good throughout the center of the film area, including most of the edge areas along the long sides of the frame. Only on the outermost 10-12mm of the negative does it get truly bad. It goes downhill fast the closer to the edge you get from there, too. By the last 4-5mm it’s wildly out.
Inset No. 1 is from right in the top corner, and heavy focus blur can be seen. You can even see that in the inset area alone the focus gets worse as you move from left to right.
Inset No. 2 is along the bottom edge but about 20% in from the short side, where focus is fairly sharp all around. The horses toward the left side are just outside the blurred zone.
Inset No. 3 is near the center of the frame and focus is quite sharp and even throughout this sample area. That you can make out the branches of the trees nearly a mile away never ceases to amaze me, and is the single biggest draw of medium format.
I’d like to take a second to point out that these are taken from a flatbed scan at 4800 dpi and 100% size; I then convert those to 600 dpi and 800% size (winds up big enough for a little cropping and an 8×10 or 9×13 digital print at fairly good quality. Being a scan from my Epson V600, though, it isn’t as good as a high-end flatbed scanner or any half-decent drum scan.
That being cleared up, these are pretty small crops — considerably smaller than the size of a 35mm frame — lifted from the giant 6×9 negative. The combination of those things means, to me, that the focus in the center third or so of the frame is pretty exceptional. So what could cause the focus to be off for only a small bit of the frame.
I questioned how it could be so bad only at those outer edges, and arrived at a realization — three rolls in, I had only used black and white film. I needed to try a roll of color film — even lousy color film — and check for chromatic aberration.
So I acquired some more Lomography Color Negative ASA 100 film and set out to make a few frames with it. Most discussions of Lomography’s color negative film include speculation that, since they don’t actually manufacture film, these stocks are mostly bulk-purchased film that failed QA on the originating manufacturer’s line. I don’t know how much of that is true, but the markings on this roll seem to indicate that it might be Fujifilm stock.
So, even if the film failed some sort of testing process at the originating factory, the starting point was already probably excellent. It was certainly good enough to answer my question.

Right away I could tell my suspicion was confirmed. Most of each color frame is sharp and clear, but what appears as blur in black and white is clearly chromatic aberration in color. Black and white film is sensitive to all (most) visible wavelengths of light in a all places, but color film has separate emulsion layers sensitive to different colors.

In my last post I took my first dive into redscale film photography, which takes advantage of these differently-sensitive layers to create some uniquely-colored looks. But when the different wavelengths of light hit the different emulsion layers at different points, you get an obviously color-shifted blur where the edges of the different layers don’t line up.
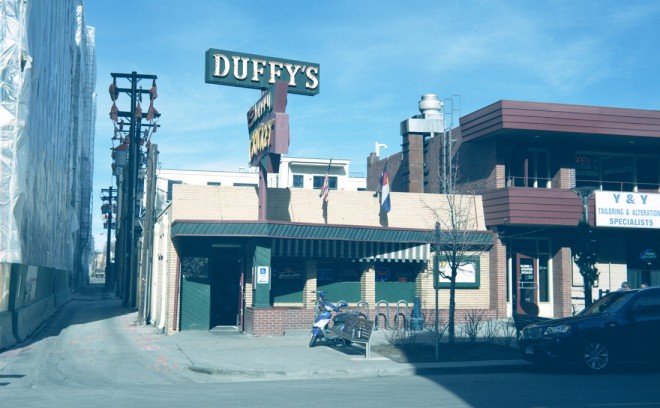
Take a look at the detail to the right, from the upper-right corner of the frame above. In the bright sun, those white window frames against the dark, tinted windows show the severity of the chromatic aberration toward the edge of the frame.
Chromatic aberration is most noticeable along high-contrast edges, where the separation of the colors that would’ve combined into bright light areas is most able to permeate the multiple layers.

Chromatic aberration is the result of the way lenses bend light. Different wavelengths bend at different rates. Simple lenses, no matter how good, create chromatic aberration. When the different wavelengths high the film plane at different places, that’s when it’s a problem. The further from the center of the frame you get, the further the light has had to travel. If the different colors are on different trajectories, giving them more distance to cover gives them more opportunity to separate — that’s why the edges are the worst in my Voigtlander.
Most modern lenses have elements that are specially ground and coated to correct the angle of the light in each wavelength differently and prevent chromatic aberration.
In conclusion…
Remember in high school when you started the last paragraph of every essay with those two words?
But seriously, after solving the mystery of the edges being out of focus and learning to use it, the Voigtlander Bessa I is definitely my very favorite of my folding cameras, and one of my overall favorites. Even with a bit of chromatic aberration on the short sides, it takes fantastic pictures.
The Voigtlander Bessa Is aren’t as cheap as some other 6×9 folders you’ll see around, but they are fairly plentiful and there are quite a few around still in great shape.
Here are some more of the frames I’ve made while testing: